vExpert Homelab 2 - More Cisco 3550 Config
After setting up the basics of a Cisco 3550 in the previous blog in this series, it is time to carry out the more advanced setup. Here I’ll step through some of the options that are good to set up if you want to run a vSphere homelab on one of this type of switch. Ideally, you will want one which is L3 capable so routes as well as switches (the 3550 series is one of those oddities that can be L2 only or L3 as well, depending on the age or model).
This post is a bit of a work in progress, published now so I can step on to other stuff as well.
The following page on the Cisco website provides a raft of great info for setting up a switch
http://www.cisco.com/c/en/us/support/docs/lan-switching/inter-vlan-routing/41260-189.html
It contains really sensible advice about not using VLAN 1 for management, using separate VLANs for all your separate requirements to avoid broadcast storms or other network issues preventing you from managing the switch just when you need to get to it the most. This is all good advice.
There is also a sample config there and an explanation of what most of the lines in it actually do.
What you should do at this point though is have a plan of what VLAN configuration you want to use. No point having a switch like this if you are not going to use VLANs so you will want to have a management VLAN, VM VLAN, vMotion VLAN, maybe a storage VLAN, FT VLAN, and so on. Some of these don’t really need to be routable, but others do.
Having configured the switch from scratch previously, there is now a port waiting for you to telnet on to for further configuration. You should connect to that first, of course, and once logged in, the first command you should issue is the enable command, or en for short. Enter the enable password and you’re ready to go.
Then sh conf will allow you to see the config you have running at this point, it will be pretty basic.
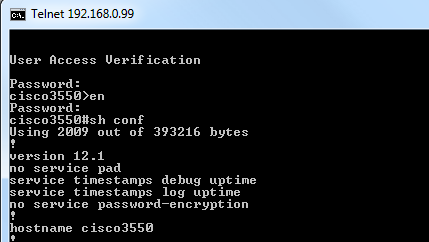
That’s the start of a config, which is easy enough to add more to.
To do this you need to enter configuration mode, so type in
conf t
At this point, you can start typing in some of the commands if you know what they are. You’re at the overall root of the switch if you like at this point, so what you do here is going to impact the switch as a whole. You can enter commands to take you into more specific config menus later in the process. In my previous post, there’s a config line that says no ip routing, which is not much good if you want to route. Typing
ip routing
will fix that (if the router accepts that command then it can route, that’s quite important).
If you need to set up individual interfaces (and you will) then you can dig deeper into the config menus to do that. The image below shows what happens when you type different commands.
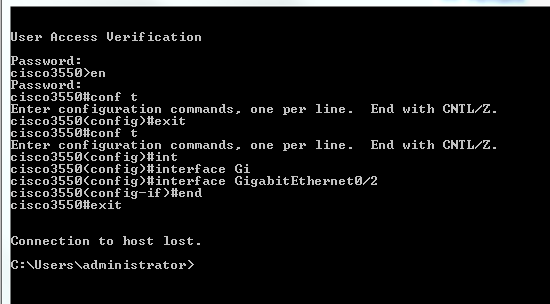
So once you conf t you get into a menu prompt and you can exit out of that.
If you want to configure a certain port (interface) then you will need to find what it is. Once you have gone back into conf t again then you need a sub-menu for the interface itself. On this switch they are called GigabitEthernet0/1 to GigabitEthernet0/12. Pressing the tab key completes commands for you so you can see I typed int and pressed tab to get interface and then I typed Gi and pressed tab to get interface GigabitEthernet I then just added 0/2 on the end and I am in. Note how the prompt is now
cisco3550<config-if>
I then show you how the command
end
gets you out of the config menus and how you can exit to disconnect yourself (after you’ve remembered to copy your config where it needs to go).
I’ll add more to this post as I go along to explain a bit more about what I did, but the Cisco guide I posted above was really handy to explain things.
When you’re done with your configure terminal antics, type
exit
If you want your hard work to persist after a switch reboot, then you need to enter
copy run start
to copy the running config to the startup config. This is one of those things everyone’s forgotten at least once.
Of course, if you really mess things up, you can always go back to square 1 and wipe the whole config :-) It’s a homelab, that’s what they are for.